This tutorial is a continuation of Lua Scripting Tutorial (Beginner 1), which covered how to download and run recipes, and use the recipe output window.
In this tutorial, you'll use the built-in Foldit recipe editor to look at and modify existing recipes. Optionally (but highly recommended), you'll learn to export Foldit recipes to a file for use with an external editor.
This tutorial updates the recipe from the first tutorial, adding additional print statements which report the score before and after the build.
This tutorial uses the following recipe:
By the end of this tutorial you'll have learned to:
- open and view a recipe in the Foldit recipe editor
- modify an existing recipe and save it
- optionally, export a recipe, modify it in an external editor, and re-import it
The next tutorial, Lua Scripting Tutorial (Beginner 3), introduces key programming concepts: variables, functions, and if-then-else statements.
Using the Foldit recipe editor[]
As in the previous tutorial, start Foldit and open one of the beginner or revisiting puzzles.
Download Beginner Rebuild SCRIPT 2.01a using one of the methods discussed in Lua Scripting Tutorial (Beginner 1).
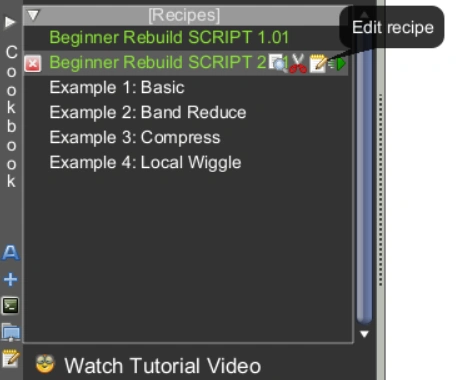
The "Edit Recipe" notepad icon loads a recipe into the Foldit recipe editor.
Once you have the recipe downloaded, hover over the recipe name in the cookbook. You'll see a small notepad icon, and an "Edit recipe" popup appears when you move the mouse over this icon. Click on the notepad icon to open the Foldit recipe editor.
There's also a notepad icon on the left edge of the cookbook in the original interface or the bottom edge of the cookbook in the selection interface. You can use this icon, but then you have to select the correct recipe using the "Load" button at the bottom of the recipe editor window.

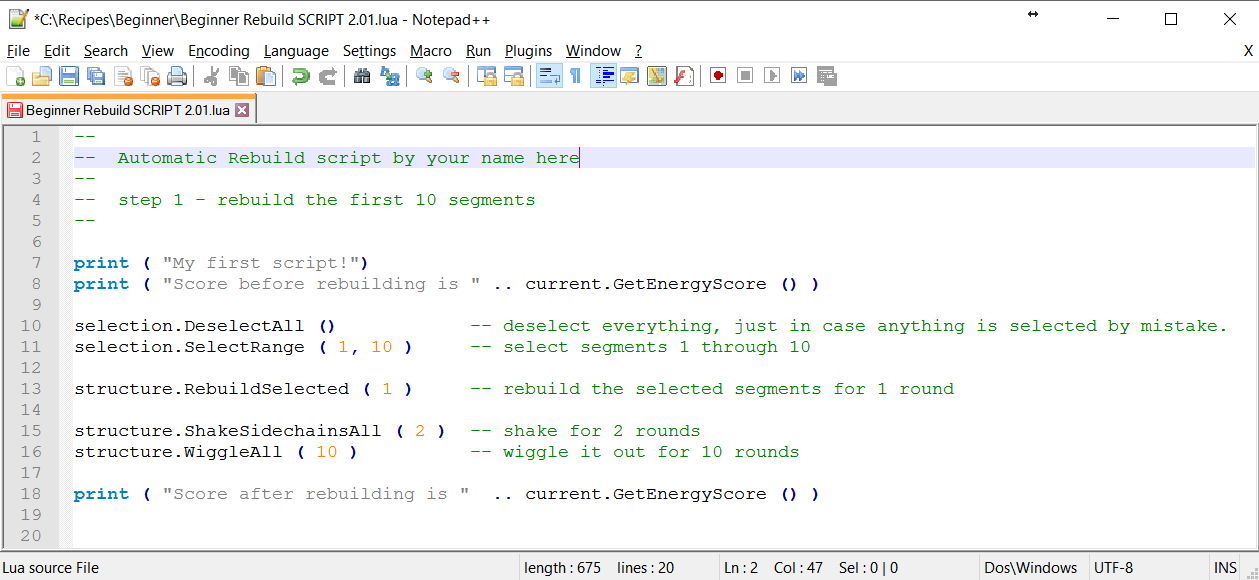
Foldit recipe editor. The goal is to replace "your name here" with your name.
In the recipe editor, you'll the recipe has a comment with "your name here" at the beginning. Try replacing "your name here" with your name.
You may notice that some of the usual tricks don't work. You can't highlight "your name here" and hit delete or backspace to erase it. The best way to change it is to position the cursor after "here" and backspace. Then you can add your name.
You may also notice that it you make a mistake, there's no "undo" option visible, and the usual shortcuts like control+z don't work either.

The Save button in the recipe editor saves the recipe to your cookbook.
Complete the first step by changing the comment, then click "Save" at the bottom of the recipe editor window. You've now saved an updated copy of the recipe, replacing the previous version in your cookbook. You can always download the recipe again if needed.

The Save As button lets you save the recipe with a new name.
Optionally, instead of "Save", you can click "Save As". This allows you give the recipe a new name and description. That's not necessary for this tutorial, but it's a good idea if you make more complex changes.
Finally, run the recipe by clicking on the "Run" button at the bottom of the recipe editor window. The recipe editor window hides itself while the recipe is running. If you don't already have the recipe output window open, click on "Show Output" in the recipe status window to open it.
The recipe editor window reappears when the recipe finishes, you can click on "Close" to get back to the main window and view the recipe output.
You'll see that the recipe printed the score before and after the rebuild. The score after the rebuild may not be higher than the score before. If it's lower, you can use "Restore Recent Best" from the Undo menu to reset the protein to the previous position.
Using an external editor[]
The Foldit recipe editor lacks a lot of features found in even simple text editors like "Notepad" on Windows. You can't select text by dragging over it with the mouse, so you can't cut or copy a selection.
(You can "select all" with control+a and then copy (control+c) or cut (control+x). You can also paste at the cursor position with control+v.)
The Foldit editor doesn't have an "undo" function. If you make a mistake on a recipe that's already been saved, you can click and "Load" and reload the same recipe from the list. All your changes are lost if you do this.
The Foldit editor also lacks a "find" command, and so of course there's no "replace" command, either.
Exporting a recipe to a file[]


The Save As dialog. Copy the recipe title using ctrl+a, ctrl-c. Then click Export.
Fortunately, it's easy to export recipes to a file, then work on them using an external editor. Even Notepad is a big improvement over the Foldit editor. Many editors provide additional features, such as syntax highlighting, which highlights the "keywords" in the programming language you're using. The freeware Notepad++ editor, available for Windows, supports Lua and several other programming languages in this way.
To export a recipe, open the recipe in the Foldit recipe editor, then click on "Save As" at the bottom of the editor window.
The Foldit "Save As" dialog shows the recipe title and description. It's usually a good idea to copy the recipe title at this point. Click in the recipe title box, then select all with control+a and copy with control+c. You'll now be able to paste the recipe title in the next step.

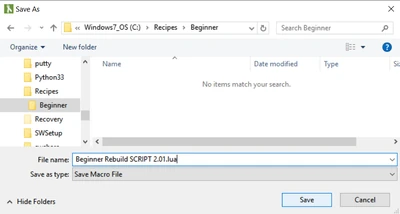
The Export button opens a standard Save As dialog. Paste in the recipe name, and add ".lua" on the end. Create a new folder or directory as needed.
You'll see the "Save As" dialog has an "Export" button. Click on "Export". You should see a standard "Save As" dialog appear. On Windows, the "Save As" looks a lot like Windows Explorer. Navigate to a spot where you want to save the recipe. You may want to create a new folder (directory) to store your recipes.
Once you've found a good spot, paste the recipe name you copied in the previous step into the file name box. Add the extension ".lua" at the end. (This "Save As", does not automatically add the correct file extension.) Click "Save".
You can now use the editor of your choice.
Windows tips[]
If you're using Notepad, you'll need to select "All Documents (*.*)" from the "Open" dialog to see files with the ".lua" extension. In Windows explorer, you can right-click on your recipe, then select "Open With...", and then "Notepad".
If you're using Notepad++ or another programming editor, it should be able to open files with the ".lua" extension directly.
On Windows, you can set a default program to open files based on their extension. You can tell Windows to use the editor of your choice to open ".lua" files. (With luck, Windows will simply ask you which program you want to use....)
By default, Windows hides the extensions of "known" file types in Windows Explorer and similar spots. So, after you pick an editor, you'll see just "My Script" listed instead of "My Script.lua". It's generally less confusing to turn this option off, so you'll always see the full file name, "My Script.lua".
Once you've opened the recipe in your editor, change the initial comment and save the recipe.
Importing a recipe from file[]
The final step is to import the updated recipe back into Foldit.
For this step, you should have Beginner Rebuild SCRIPT 2.01 open in the Foldit recipe editor.
Optionally, you can create a new recipe at this step. Just click on "New (ScriptV2)" at the bottom of the editor window. You may get a warning that says all your changes will be lost. You can click "Yes" to continue, because you're already saved the recipe to a file.
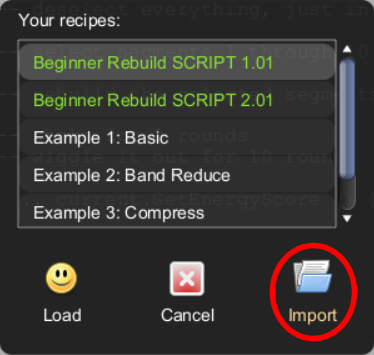
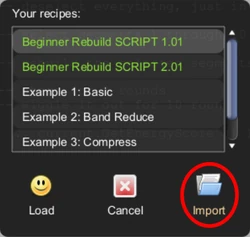
The Import button in the Load dialog lets you import a recipe from a file.
Click on "Load" at the bottom of the recipe editor window. You'll see an "Import" button. "Import" should take you back to the spot where you saved the recipe. You'll see all files, so you should see your recipe even if you didn't add ".lua" to the name. Select your recipe, then click "Open".
The updated recipe is loaded into the Foldit recipe editor. If you didn't already click "New (ScriptV2)", you'll see a warning about losing all your changes. Click "Yes" to continue.
The updated recipe has not been saved to the Foldit cookbook yet. You can run the recipe from the recipe editor to test it.
When you're ready to save the recipe, click "Save" or "Save As". If you've already started a new recipe, these two options are the same. You'll need to give the recipe a name and a description. If you still have the existing recipe open, "Save" replaces the existing recipe in the cookbook, while "Save As" lets you create a new recipe, leaving the existing recipe unchanged.
Wrap up[]
In this tutorial, you learned how to open a Lua recipe in the Foldit recipe editor. You also learned some of the shortcomings of the Foldit recipe editor.
The Foldit recipe editor lets you export recipes to a file, which allows you to use the full-featured editor of your choice. Although this step is optional, it's highly recommended for anything but the most minor changes. The tutorial covered the steps necessary to get started with using an external editor.
This tutorial didn't really discuss the recipe, which is very similar to the one in the first tutorial. The details of the recipe will become more important in the next tutorial. See Lua Scripting Tutorial (Beginner 2 Tech Supplement) for more on the recipe.
| Back to Lua Scripting Tutorial (Beginner 1) | Continue with Lua Scripting Tutorial (Beginner 3) |